Windows 101 - The Start Menu: Difference between revisions
No edit summary |
No edit summary |
||
| Line 1: | Line 1: | ||
=== Windows 101: The Start Menu === | === Windows 101: The Start Menu === | ||
| Line 7: | Line 8: | ||
* The app list starts with system apps, like the '''Calculator''' and '''Calendar''', followed by more specialized software installed on your computer. | * The app list starts with system apps, like the '''Calculator''' and '''Calendar''', followed by more specialized software installed on your computer. | ||
* Some programs may have a small arrow beside them, indicating they contain additional sub-programs or tools. Clicking the arrow will expand these items to show what's available. [[File:Windows 101 - Interface - Start Menu.png|942x942px]] | * Some programs may have a small arrow beside them, indicating they contain additional sub-programs or tools. Clicking the arrow will expand these items to show what's available. <br> <br>[[File:Windows 101 - Interface - Start Menu.png|942x942px]]<br> | ||
==== Searching for Programs ==== | ==== Searching for Programs ==== | ||
Even though the search bar isn’t visible in your Start Menu, you can start typing as soon as the Start Menu is open to search for programs. Windows will automatically detect your input and show relevant results. | Even though the search bar isn’t visible in your Start Menu, you can start typing as soon as the Start Menu is open to search for programs. Windows will automatically detect your input and show relevant results. | ||
For example, if you want to open '''Google Chrome''', simply open the Start Menu, start typing "Chrome," and click on the result when it appears.< | For example, if you want to open '''Google Chrome''', simply open the Start Menu, start typing "Chrome," and click on the result when it appears.<br><br><br> | ||
==== Power Options ==== | ==== Power Options ==== | ||
At the very bottom of the Start Menu, you’ll find the '''Power button'''. This button provides essential power management options for your computer. In your setup, we only use the following options: | At the very bottom of the Start Menu, you’ll find the '''Power button'''. This button provides essential power management options for your computer. In your setup, we only use the following options: | ||
| Line 19: | Line 19: | ||
* '''Shut Down''': Turns off your computer completely. | * '''Shut Down''': Turns off your computer completely. | ||
* '''Restart''': Restarts your computer, which is useful when updates are installed or when troubleshooting issues. | * '''Restart''': Restarts your computer, which is useful when updates are installed or when troubleshooting issues. | ||
The '''Sleep''' option is not used, so you can safely ignore it.<blockquote>[picture] showing the Power button and options</blockquote> | The '''Sleep''' option is not used, so you can safely ignore it.<blockquote>[picture] showing the Power button and options</blockquote> | ||
----Now that you know how to navigate your specific Start Menu and use its features, accessing your programs and managing power options will be easier. In the next lesson, we’ll explore '''Context Menus''', which give you additional options when you right-click on items in Windows. | ---- | ||
Now that you know how to navigate your specific Start Menu and use its features, accessing your programs and managing power options will be easier. In the next lesson, we’ll explore '''Context Menus''', which give you additional options when you right-click on items in Windows.<br> | |||
Revision as of 20:19, 11 September 2024
Windows 101: The Start Menu
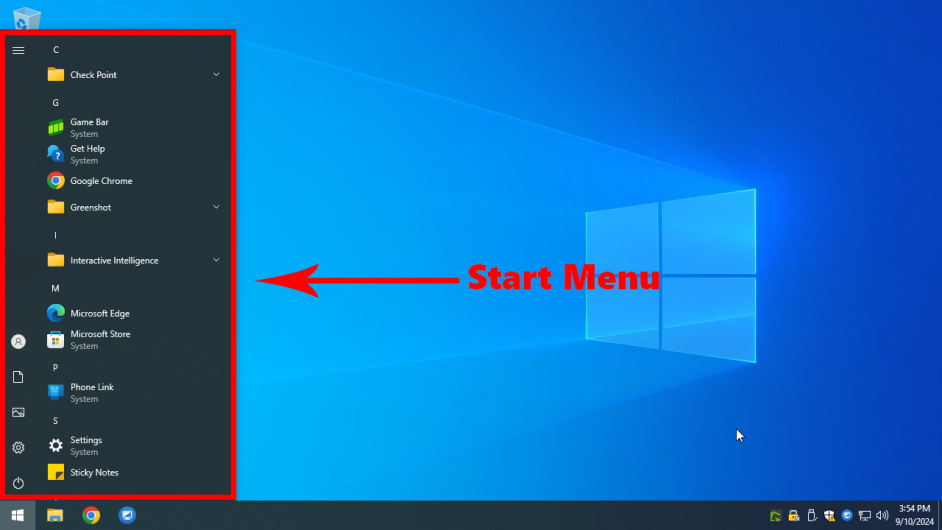
In this lesson, we’ll take a closer look at your specific Start Menu setup, which provides access to all your programs and power options. Understanding how to navigate this menu will help you quickly find what you need.
The App List
Your Start Menu contains a single section: the app list. This is an alphabetical list of all the programs installed on your computer. You can easily scroll through it to find the application you want to use.
- The app list starts with system apps, like the Calculator and Calendar, followed by more specialized software installed on your computer.
- Some programs may have a small arrow beside them, indicating they contain additional sub-programs or tools. Clicking the arrow will expand these items to show what's available.

Searching for Programs
Even though the search bar isn’t visible in your Start Menu, you can start typing as soon as the Start Menu is open to search for programs. Windows will automatically detect your input and show relevant results.
For example, if you want to open Google Chrome, simply open the Start Menu, start typing "Chrome," and click on the result when it appears.
Power Options
At the very bottom of the Start Menu, you’ll find the Power button. This button provides essential power management options for your computer. In your setup, we only use the following options:
- Shut Down: Turns off your computer completely.
- Restart: Restarts your computer, which is useful when updates are installed or when troubleshooting issues.
The Sleep option is not used, so you can safely ignore it.
[picture] showing the Power button and options
Now that you know how to navigate your specific Start Menu and use its features, accessing your programs and managing power options will be easier. In the next lesson, we’ll explore Context Menus, which give you additional options when you right-click on items in Windows.